IKEA PAX CUSTOM CLOSET - KID’S EDITION

When our house was built, everything was bare minimum, builder-grade. My daughter’s closet was a perfect example of that. There was one Closetmaid shelf that was a very inefficient use of space, especially with tiny kids’ clothes. Additionally, the shelf was too deep for the space, so if there were clothes hanging on the left side, the door would run into them. I go into more details below, but I had to come up with something that not only made better use of this space but also dealt with some odd dimensions.
Kids. have. so. much. stuff. And inefficiency in any closet can be a total waste, but especially in a child’s closet. It is so easy to avoid the clutter and live with it in disarray. I certainly did. I used to make sure the door to the closet was shut because that was the only way for me to try to ignore the disorganization. But now, I have a system that is working to keep the space organized.
In addition to maximizing space, my goal was also to have a closet system that allows my toddler to participate as much as possible in daily chores like laundry, getting dressed, putting things away, etc. (Not to mention I have a very strong-willed and opinionated child who wants to pick out her own clothes everyday.)
Whether you update your current space, hire someone to help you, or do a complete redo like I did, an organized closet for kids has so many benefits. First, it’s nice to look at and easier to find everything. Second, it teaches your child positive habits about organization and his or her space, which also can lead to help with laundry, chores, getting dressed, etc. Lastly, it makes it easier to rotate clothes for seasons or sizes. Getting organized works to make your life easier, and the effort up front saves you effort, time, and stress later.


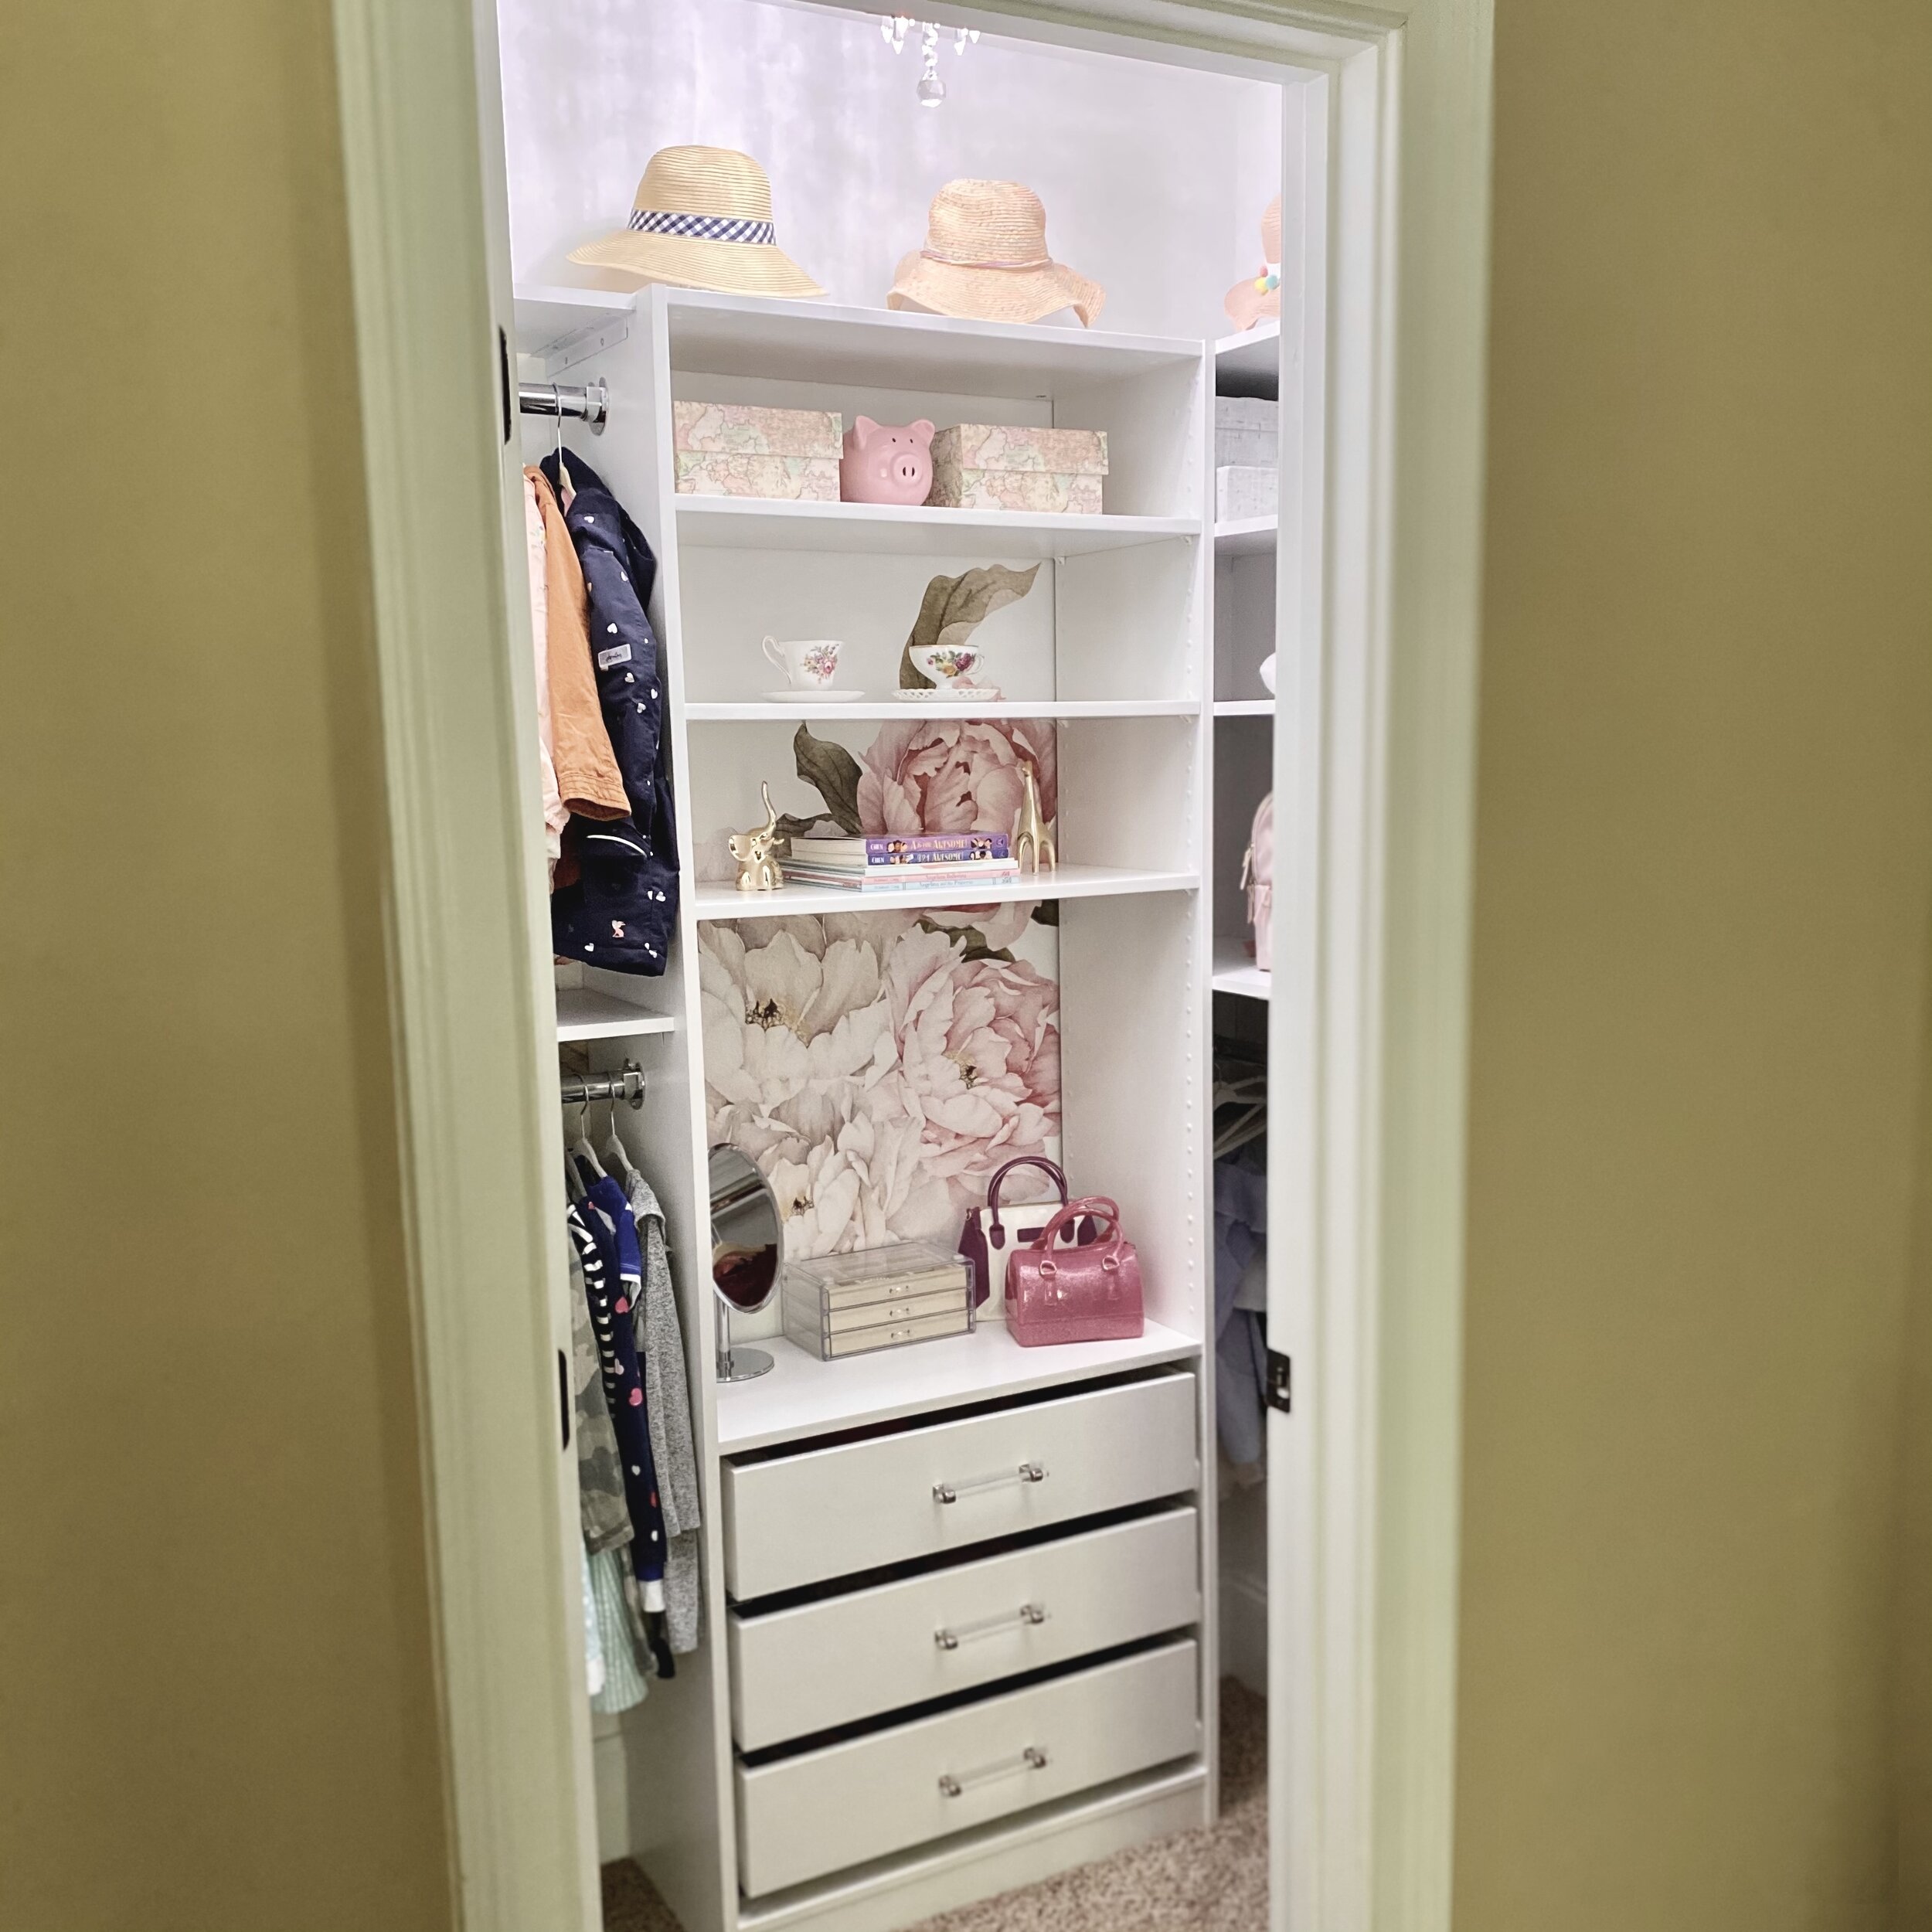
I knew I needed something “custom” to fit the space and maximize the space for the amount of stuff I needed to keep in there. I came across the Pink Dream’s IKEA hack for her daughters’ closet and decided to do something similar. Because of the dimensions, I could not do a complete IKEA system. So I customized it myself. I wanted a few drawers and I fell in love with the idea of making a little vanity. And huge bonus- my daughter can pick out her own clothes and learn to put them away. She can also reach a lot of the clothes and accessories in the closet, which was not the case in her closet before.
Here are the materials I used (I used a mix of materials from Amazon, IKEA, and Home Depot):
IKEA PAX wardrobe (29 1/2 in x 13 3/4 in x 79 1/8 in), $90.00 (linked here)
IKEA KOMPLEMENT shelf, $10.00 each (linked here)
IKEA KOMPLEMENT drawer, $25.00 each (linked here)
Acrylic cabinet pulls, $4.00-$7.00 each (linked here)
Peel and stick wallpaper, $44.00 (linked here)
Shelves (12 in x 72 in), $13.47 (linked here) (*I cut these myself, but you can ask Home Depot to cut them for you)
Brackets (11 in, 3 pack), $9.98 (linked here)
Chandelier, $29.99 (linked here)
Command hooks, $12.99/2 pack (linked here)
Chrome closet pole (96 in), $29.98 (linked here) (*I needed custom lengths, so I cut these myself… not recommended without the proper tools)
Closet rod pole sockets, $7.47 each (linked here)
Door knob with key, $12.47 (linked here )
Plastic hole plugs (I forgot to buy them at IKEA but I found substitutes on Amazon), 300 pack (linked here)

Here is the process I used:
1. I disassembled the existing shelving; repaired the walls; and primed and painted the walls, trim, and ceiling.
2. I assembled the IKEA PAX unit according to the instructions.
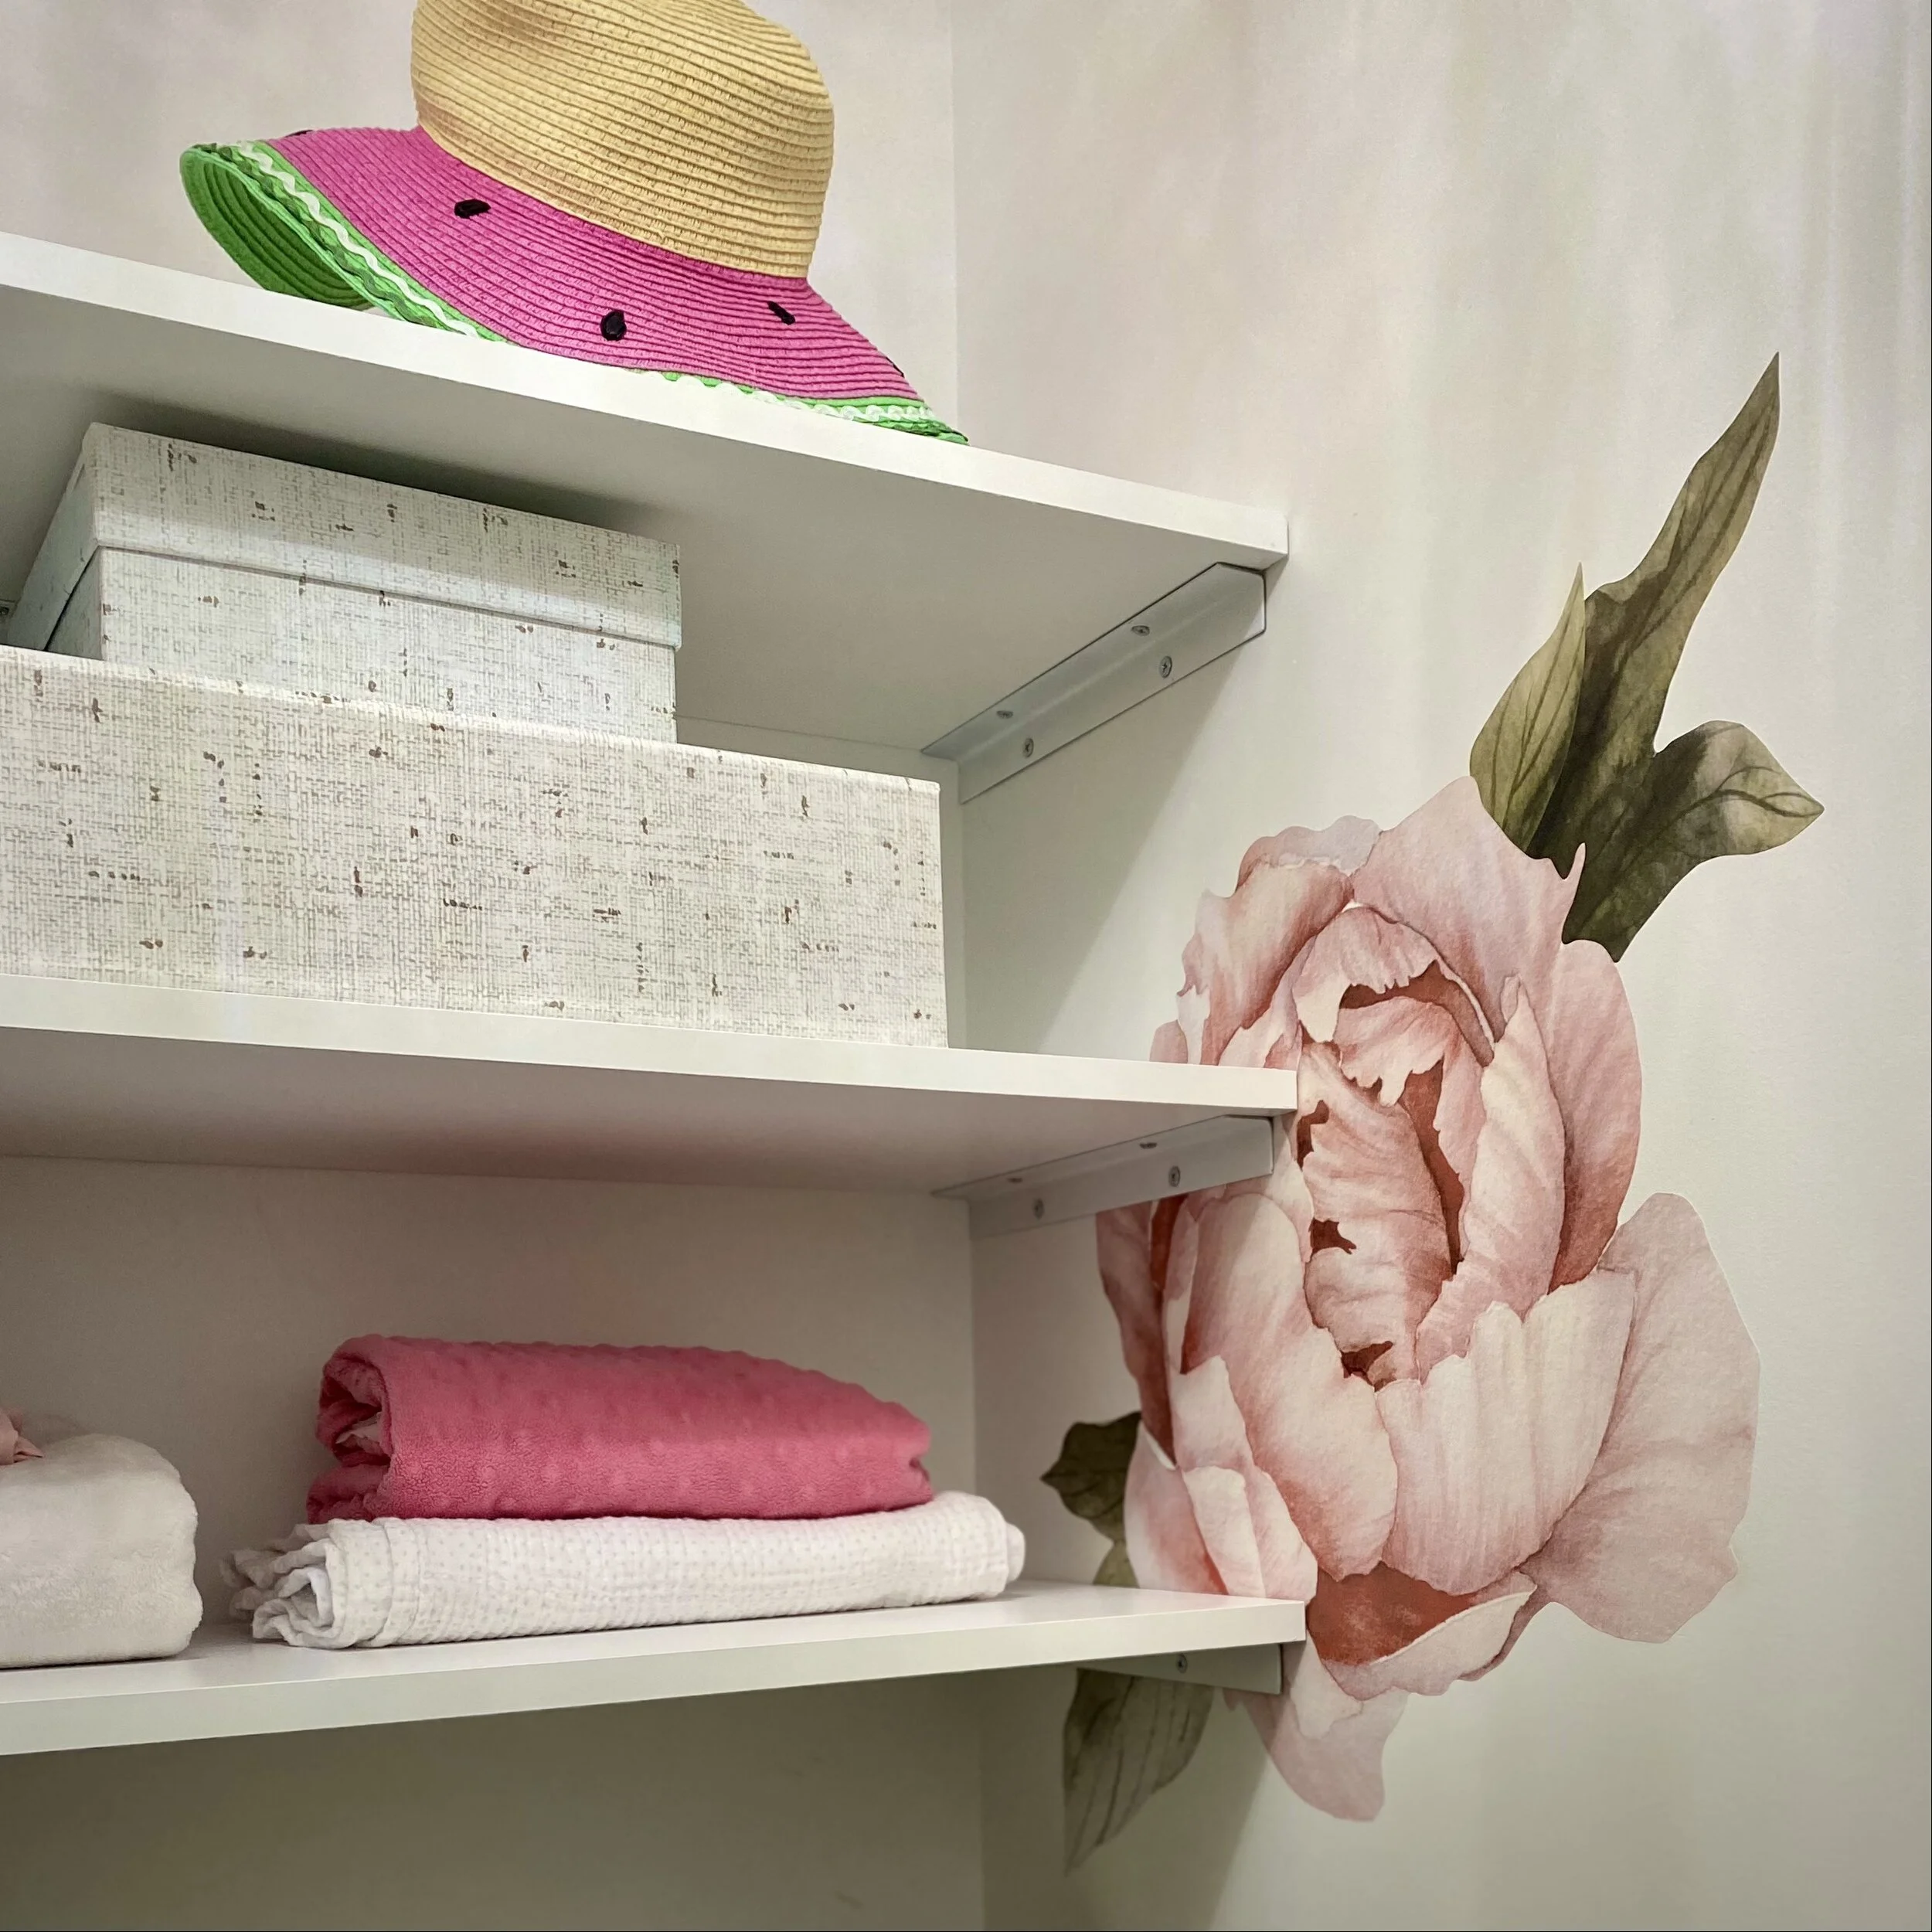
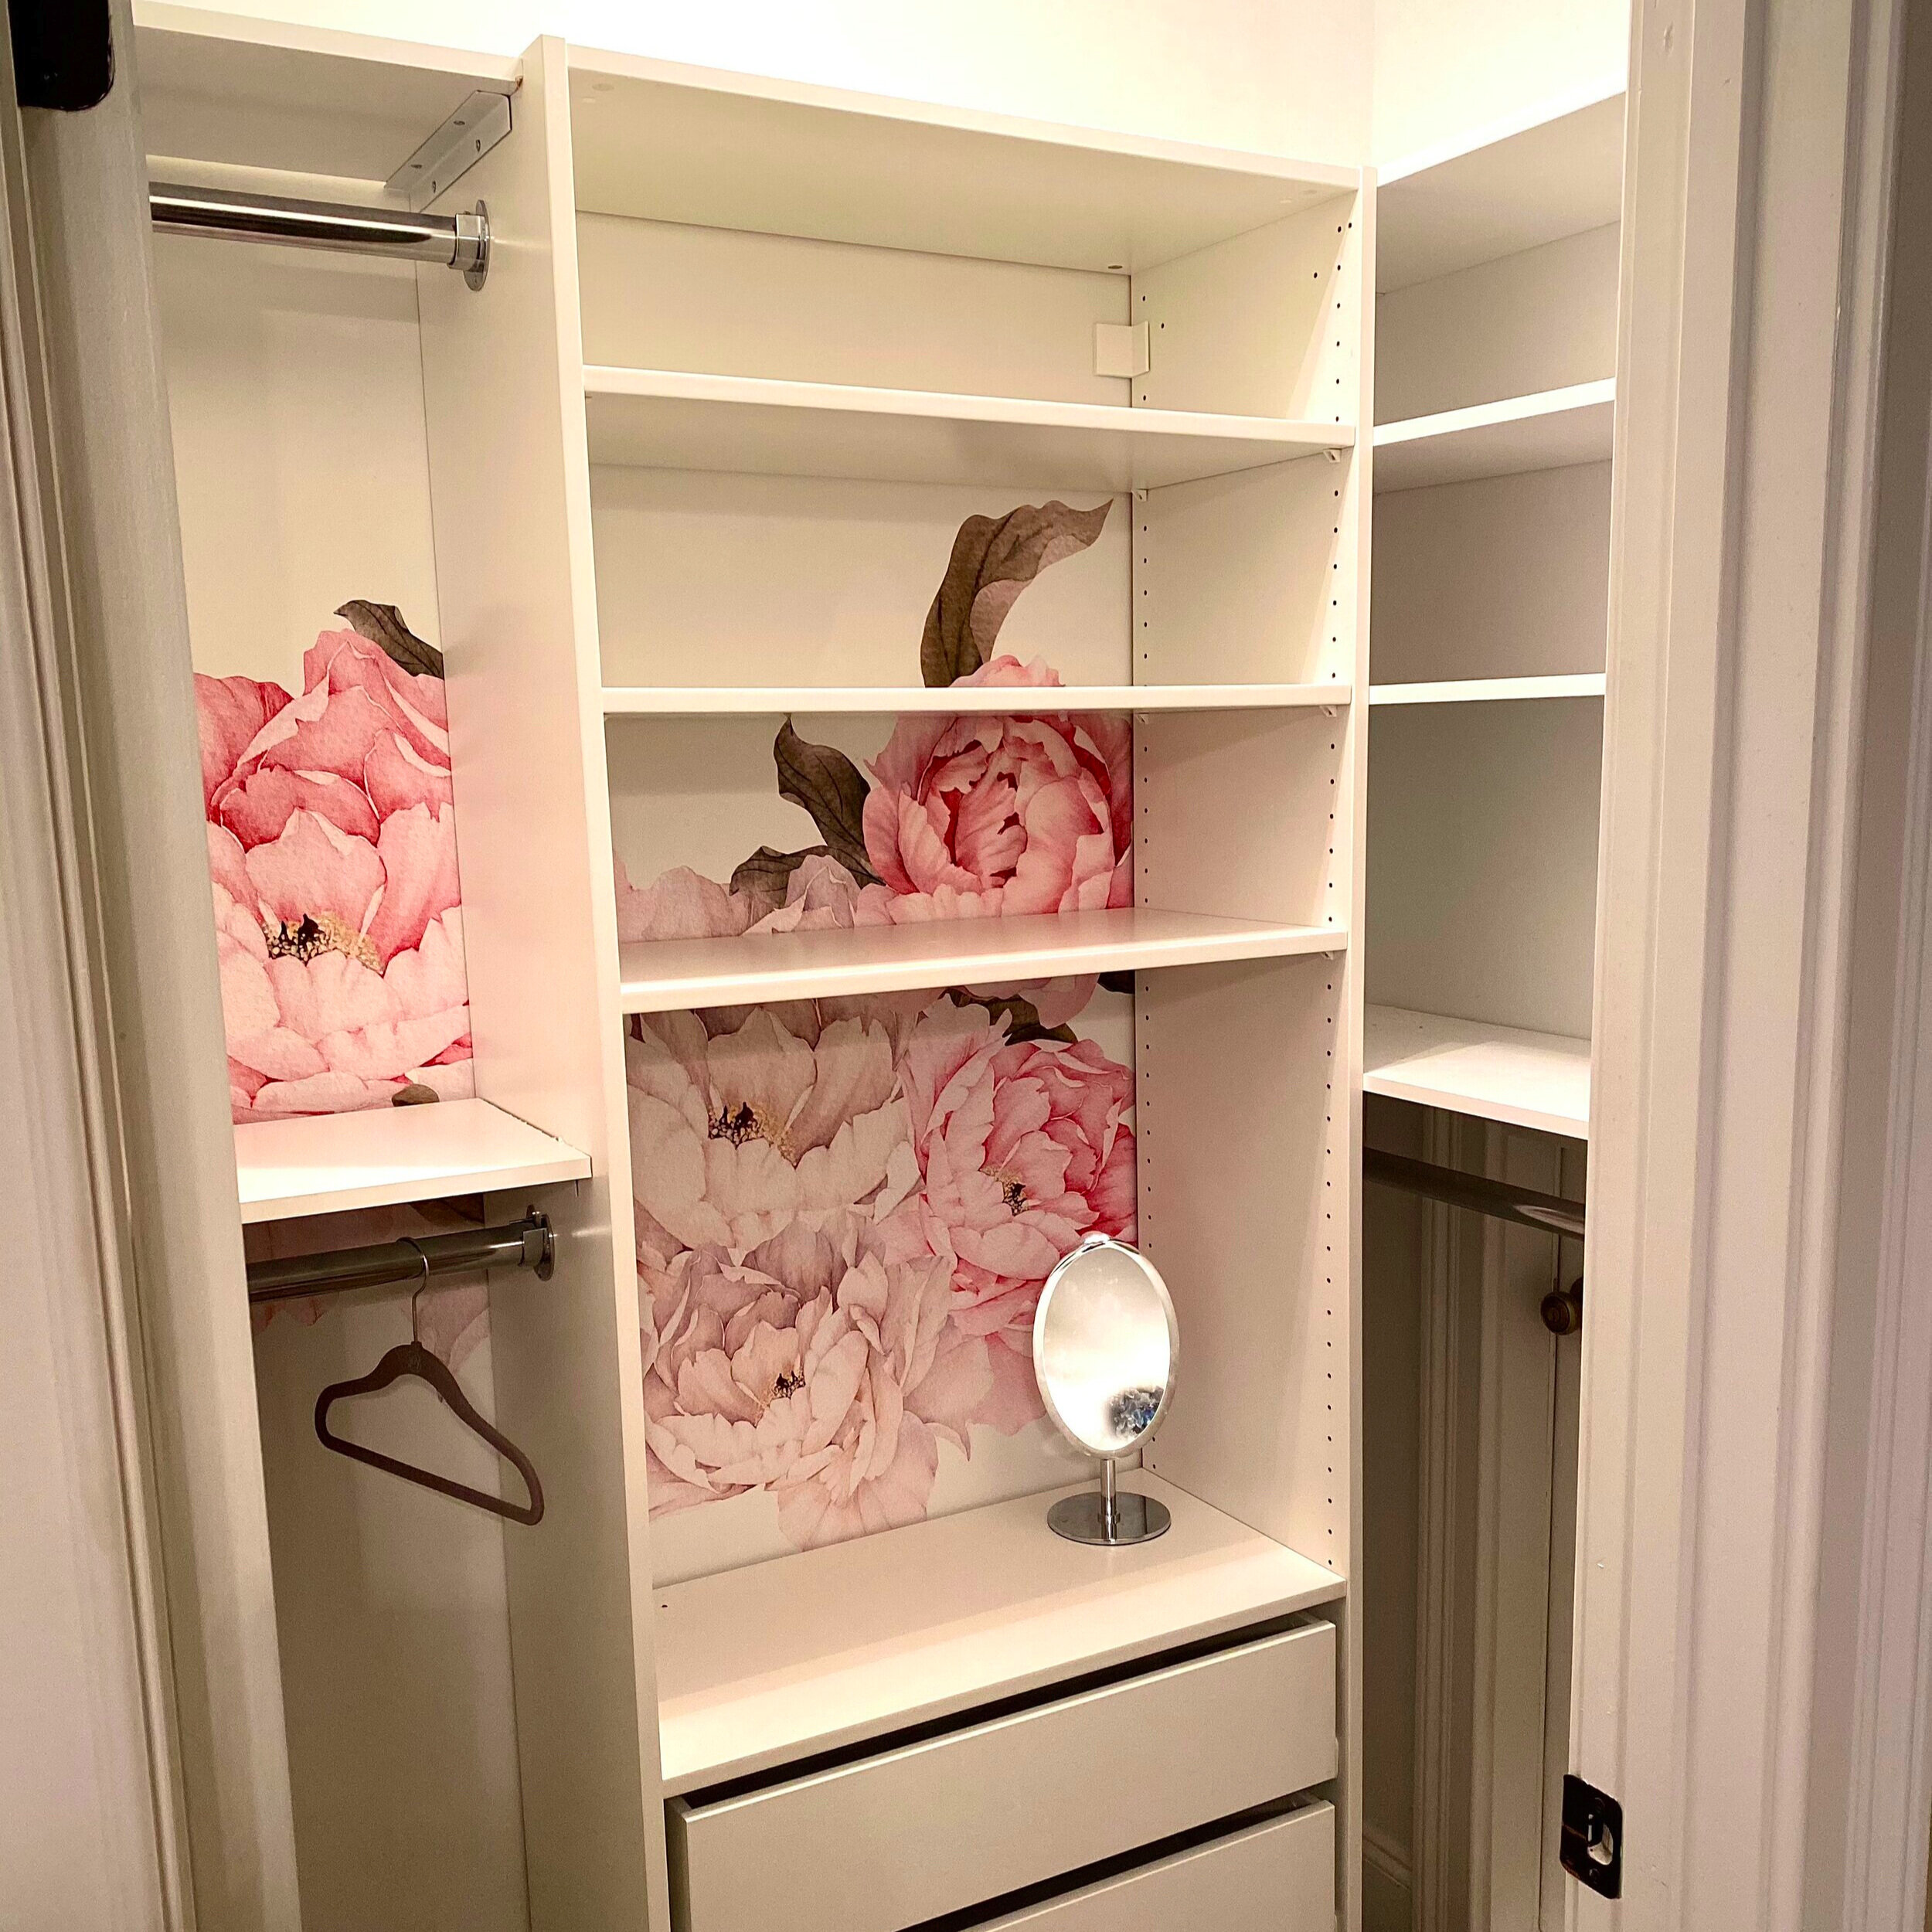
3. I had a few challenging space issues to work around in the closet. First, I needed to leave enough room to get into the crawl space door. Second, I could not use IKEA shelves throughout the closet because the IKEA shelves are 13 3/4 in. deep and when the closet door swings open, it only leaves a space for under 13 in.; therefore, I decided to use the 12 in. deep closet shelves from Home Depot so that the door could open completely and not run into the shelves or hanging clothes.

4. Based on the above issues, I used the Home Depot shelves on the right side of the closet, too. I measured 12 in. from the wall with the crawl space door to the right side of the PAX wardrobe and worked from there. Based on those measurements, I lined up the assembled unit to figure out where to place the wallpaper and where to cut the baseboards. Because I wanted the peel and stick wallpaper to show through the unit, I did not put a back on the PAX wardrobe and therefore had to remove the baseboard behind the unit so that the unit would sit flush against the wall.
5. I placed the peel and stick wallpaper on the walls. For this step, I winged it. If I did it again, I would definitely map out the decals because they do not peel off easily once you place them on the wall, so it was more difficult than I expected to shift them once they touch the wall.
6. Before I attached anything to the walls, I changed out the door knob to the crawl space to have a lock on that door. It made me too nervous to have a door to the crawl space in a child’s closet, but I also need to keep storage items in that space and occasionally have access to that space so I placed a new door knob that requires a key to unlock.
7. I attached the PAX wardrobe to the wall according to the IKEA instructions (all pieces come with the PAX wardrobe).
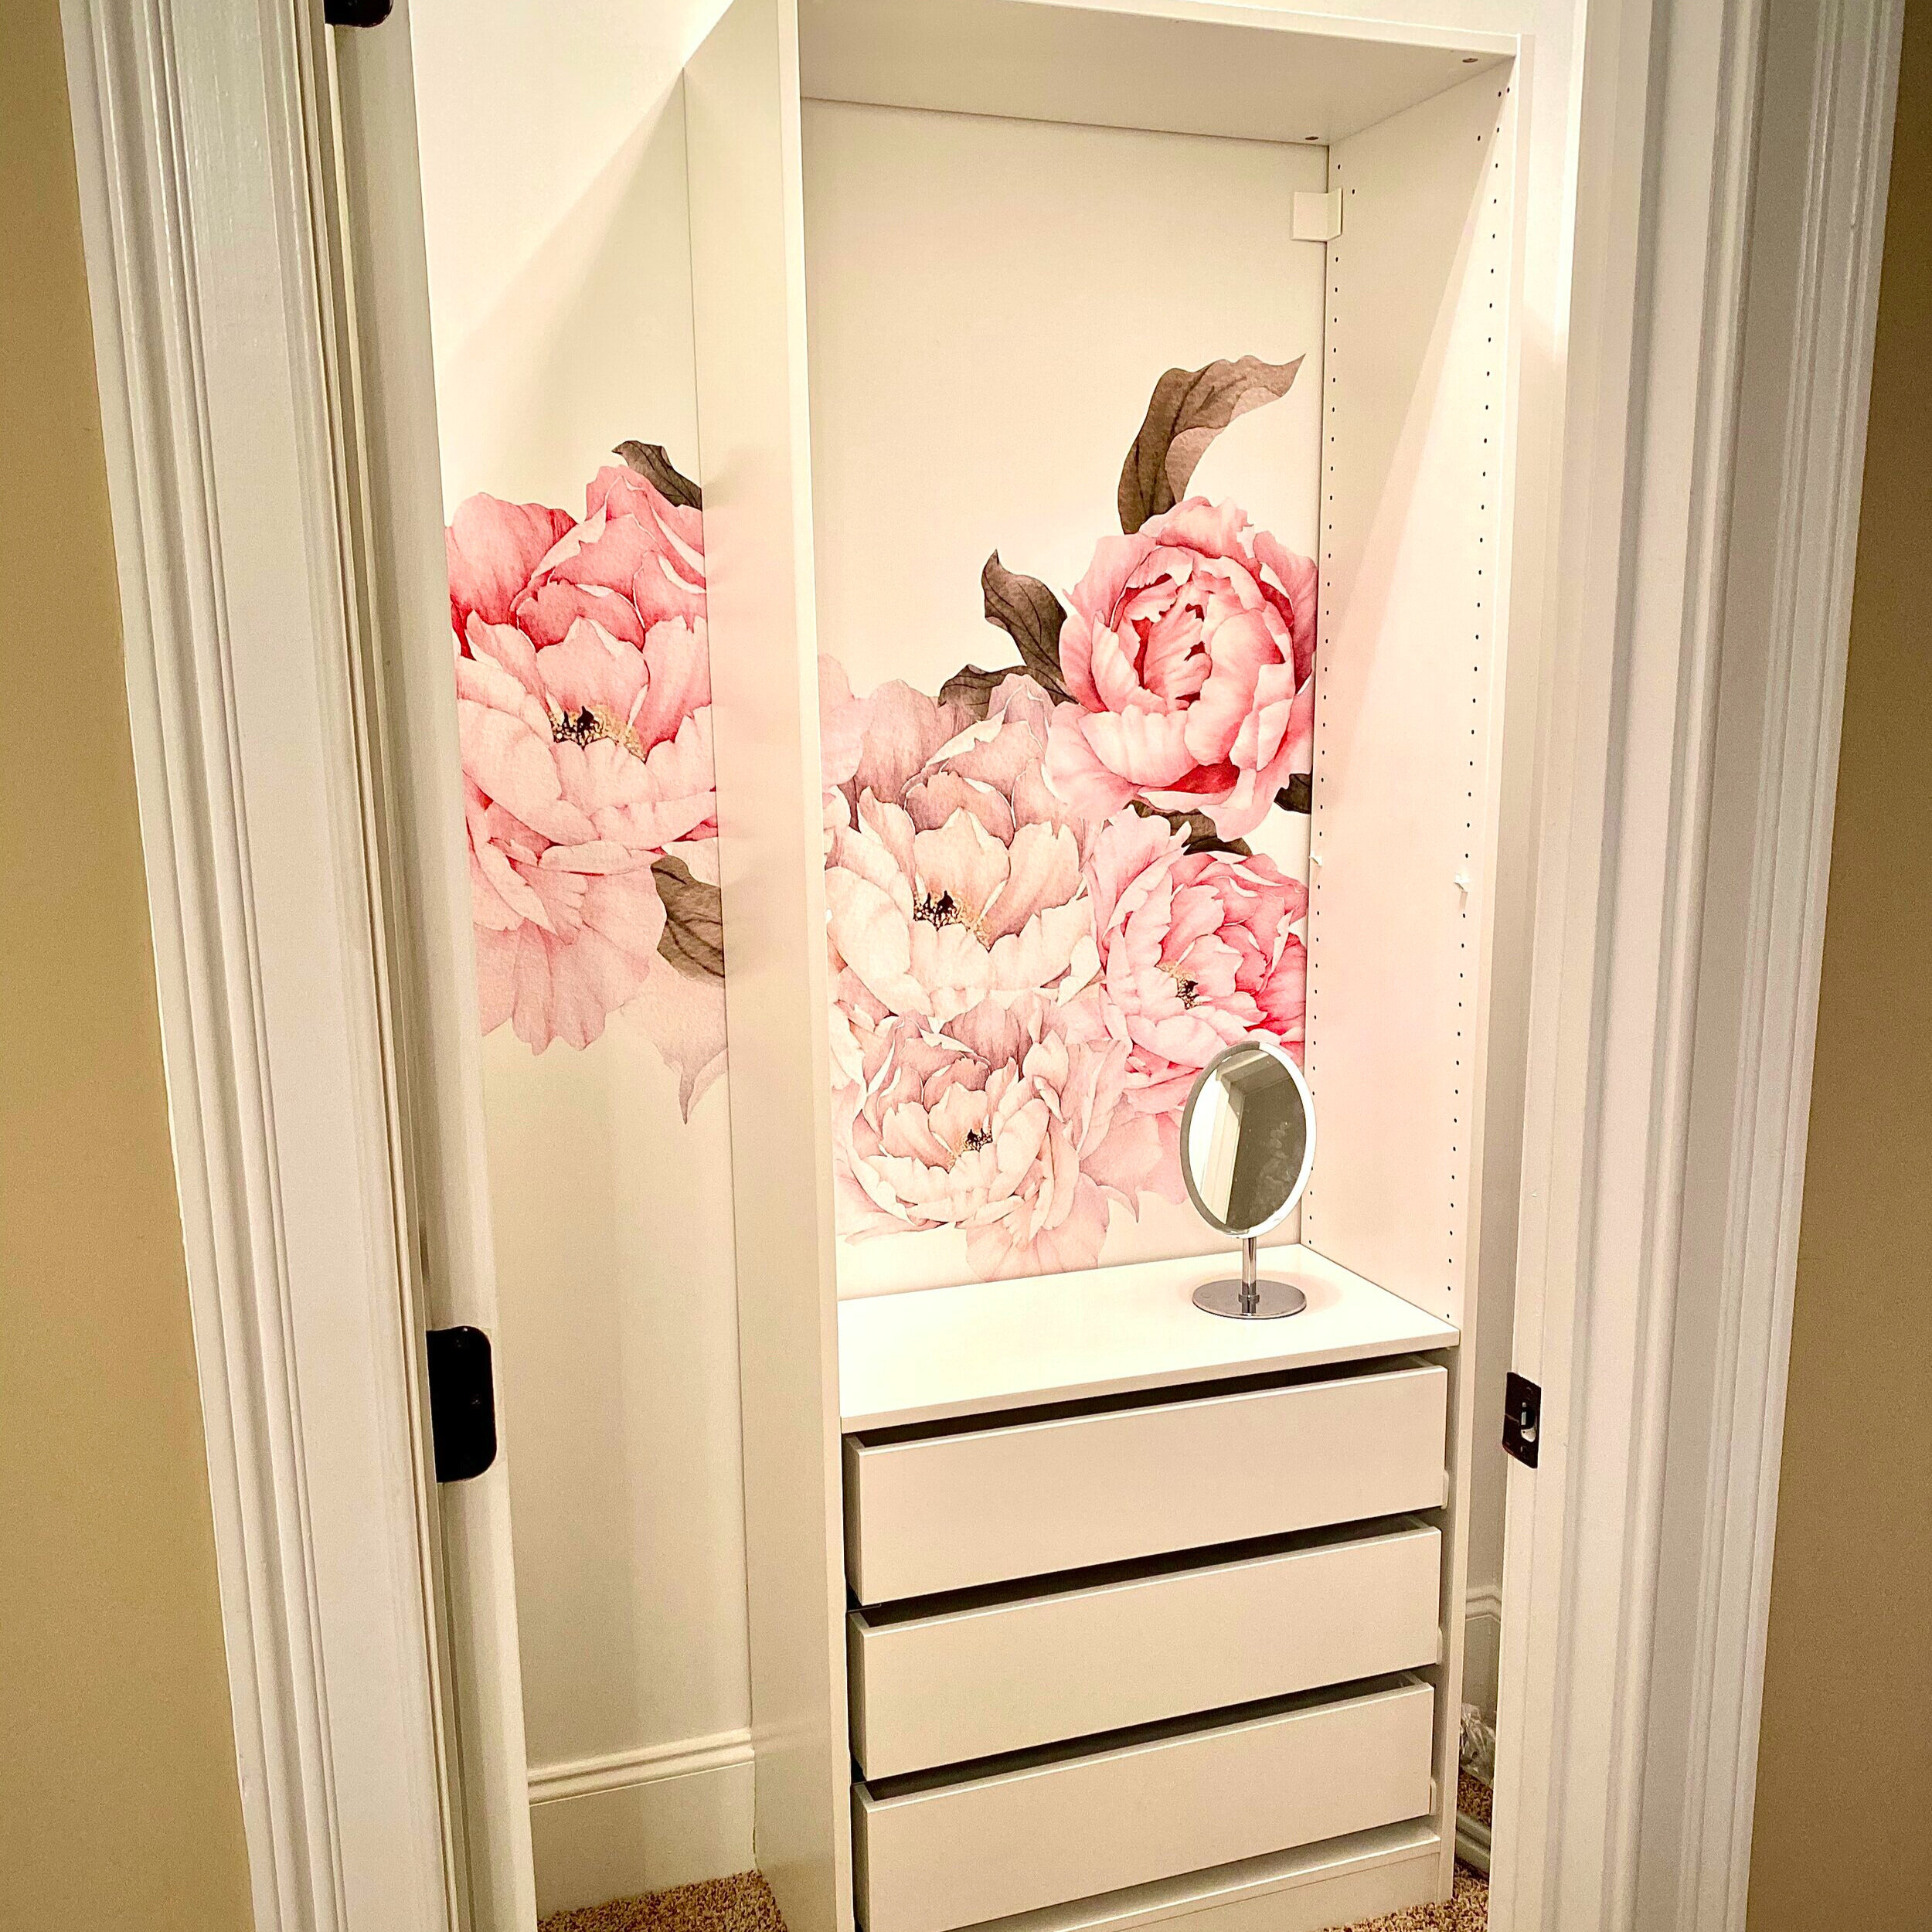
8. Since I knew I would have three drawers and a “vanity” at the bottom of the unit, I went ahead and put those into the unit. I held off on the upper shelves until I could line them up properly with the outer shelves.
9. I attached the top outer shelves to the walls and to the outer sides of the PAX wardrobe. I used brackets from Home Depot for my 12 in. shelves. (I also painted them white beforehand so they blended in a little better.)
10. After I did the top shelves, I attached all of the other outer shelves, again attaching them to the outside of the PAX wardrobe and the wall.
11. I cut the closet rod with a hack saw to make three smaller, custom-sized poles. Two for the smaller section on the left side, and one longer one on the right side. I attached the poles to the wall with the closet rod sockets.

12. I caulked a few gaps between the shelves and the wall (during this process, I realized not all of the corners in the closet were right angles and that led to gaps in the some spaces). I also painted over some scuffs and retouched some of the paint.
13. I drilled holes for the cabinet pulls on the three drawers. I used my painter’s tape trick (i.e., line up painter’s tape on the back side of the cabinet pulls, poke holes in the painter’s tape where the screw will go into the handle, and then line up/level the painter’s tape with the holes on the drawer front to drill the holes).
14. I inserted the white plugs into the holes of the PAX unit. Because I want her to be able to grow into this closet, I wanted the flexibility to add more shelves or drawers so I did not permanently fill them in with wood filler.
15. Because I shattered the existing ceiling light when I was painting, I decided to add a cute little chandelier. I got a little electrical lesson and learned how to change a light fixture (thanks, Dad!).
16. I put all of her clothes back in the closet (and I finally have a place for all of her hats) and added some cute decor.
Voila! She. Loves. It.